
If your straight hair goes flat by noon and you still want looks that photo well and survive real life, this list is for you. These are quick styles I actually do on weekdays, the tricks that saved me from limp roots and crunchy ends, and the small kit I keep on my bathroom counter. Think fast setups under 10 minutes, one or two salon visits for the cuts or color, and mostly under $50 except for a tool or two.
These ideas work best for 1A through 1C straight hair, fine to medium density, shoulder length to mid-back. A few are easy to adapt for thicker strands with a heavier product or slightly higher heat. Most can be done at home, a couple are worth a salon visit for the first time.
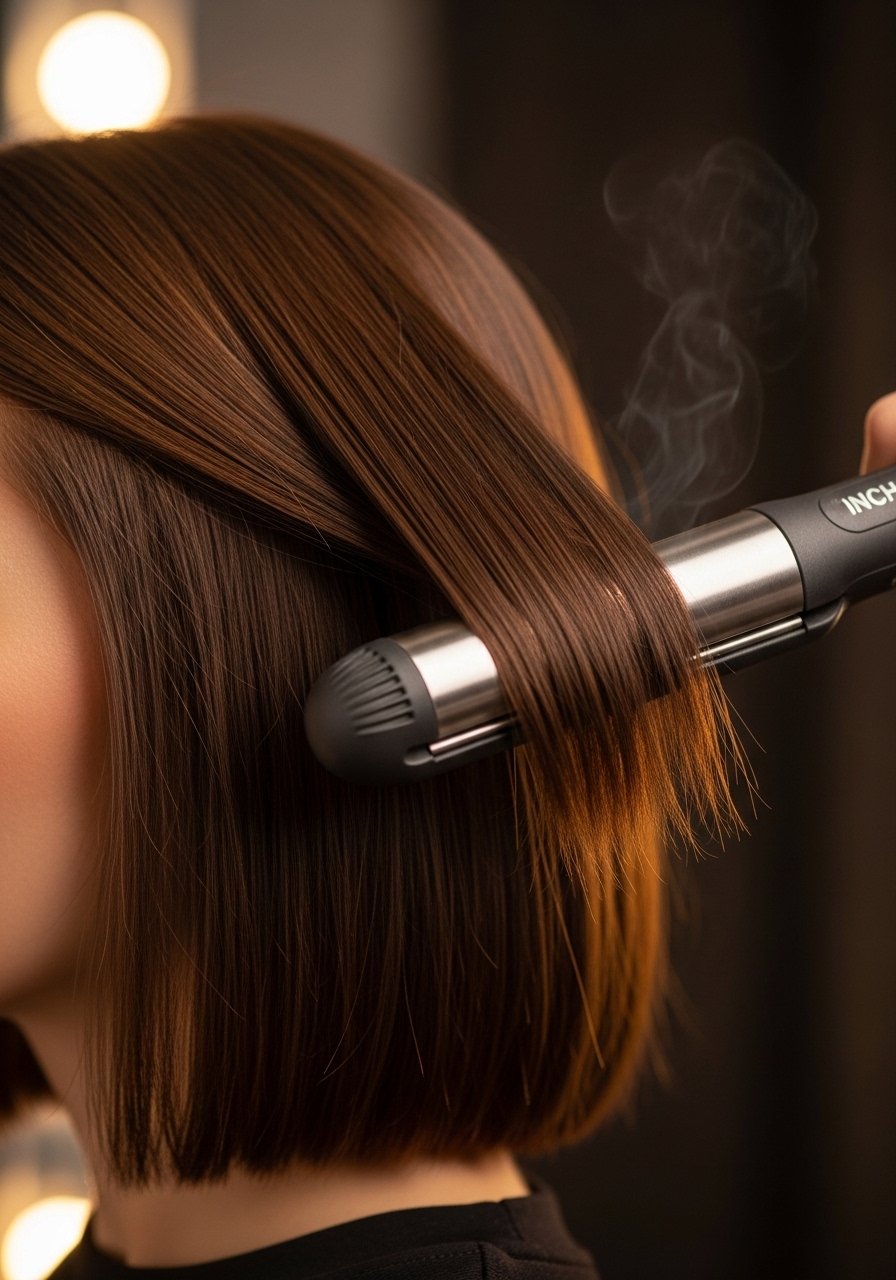
Sleek High-Gloss Blowout With a Round Brush
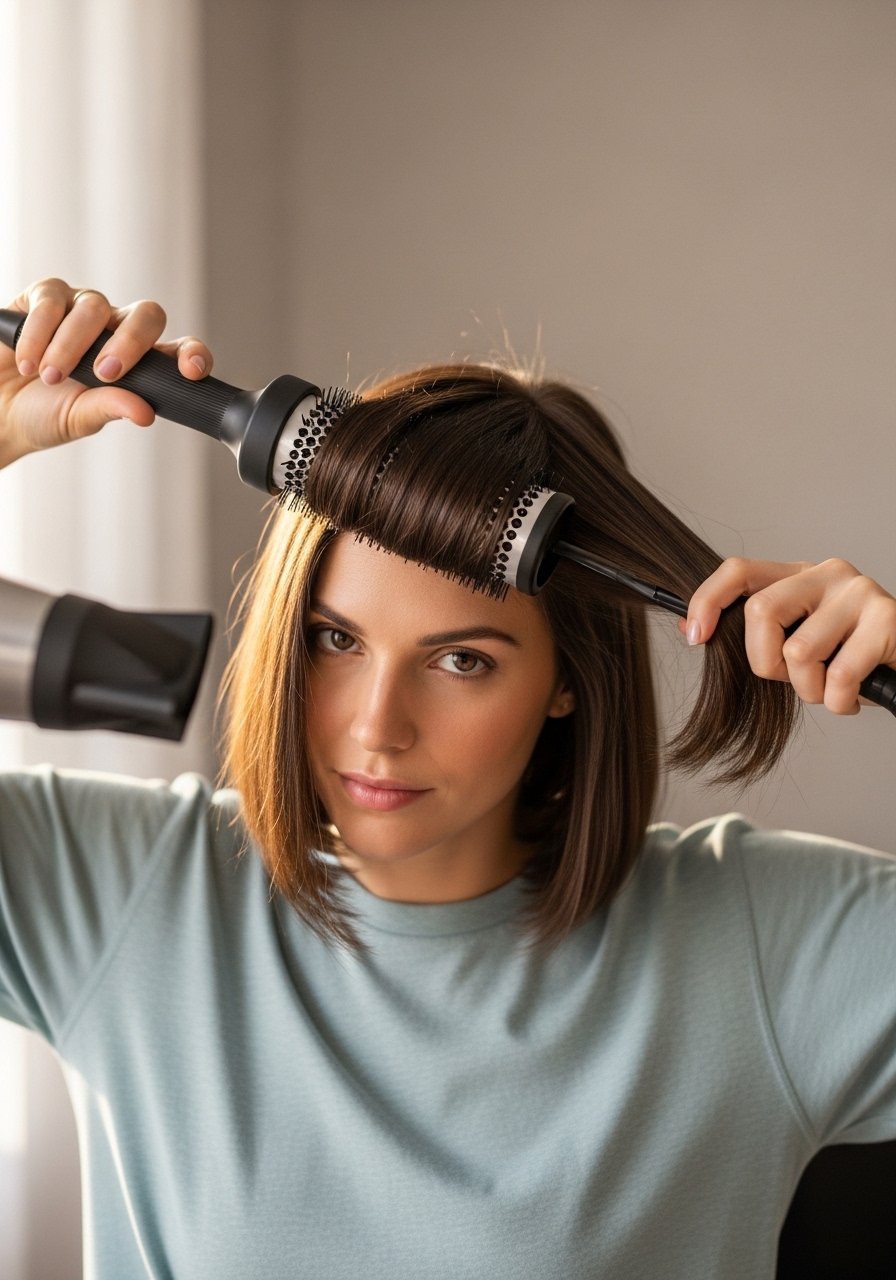
If your fine straight hair puffs at the ends or sits flat at the crown, the right round brush and a simple sequence fix most of it. Work in four 1-inch horizontal sections across the crown, two vertical sections at the sides, and one spine section at the nape. Spray a light heat protectant on damp hair, then two spritzes of a thermal spray at each section before you move the dryer across the strand for three slow passes at medium heat. For a finishing gleam, one pea size of a silicone serum on ends does the trick. I use a ceramic 1.5 inch brush so the hair stays smooth instead of bending. Common mistake, starting with towel-saturated hair. If the hair is still dripping you will get steam frizz. Salon vs DIY, you can get this look at home for under $60 with a good brush and dryer.
Face-Framing Money Piece to Brighten Straight Hair
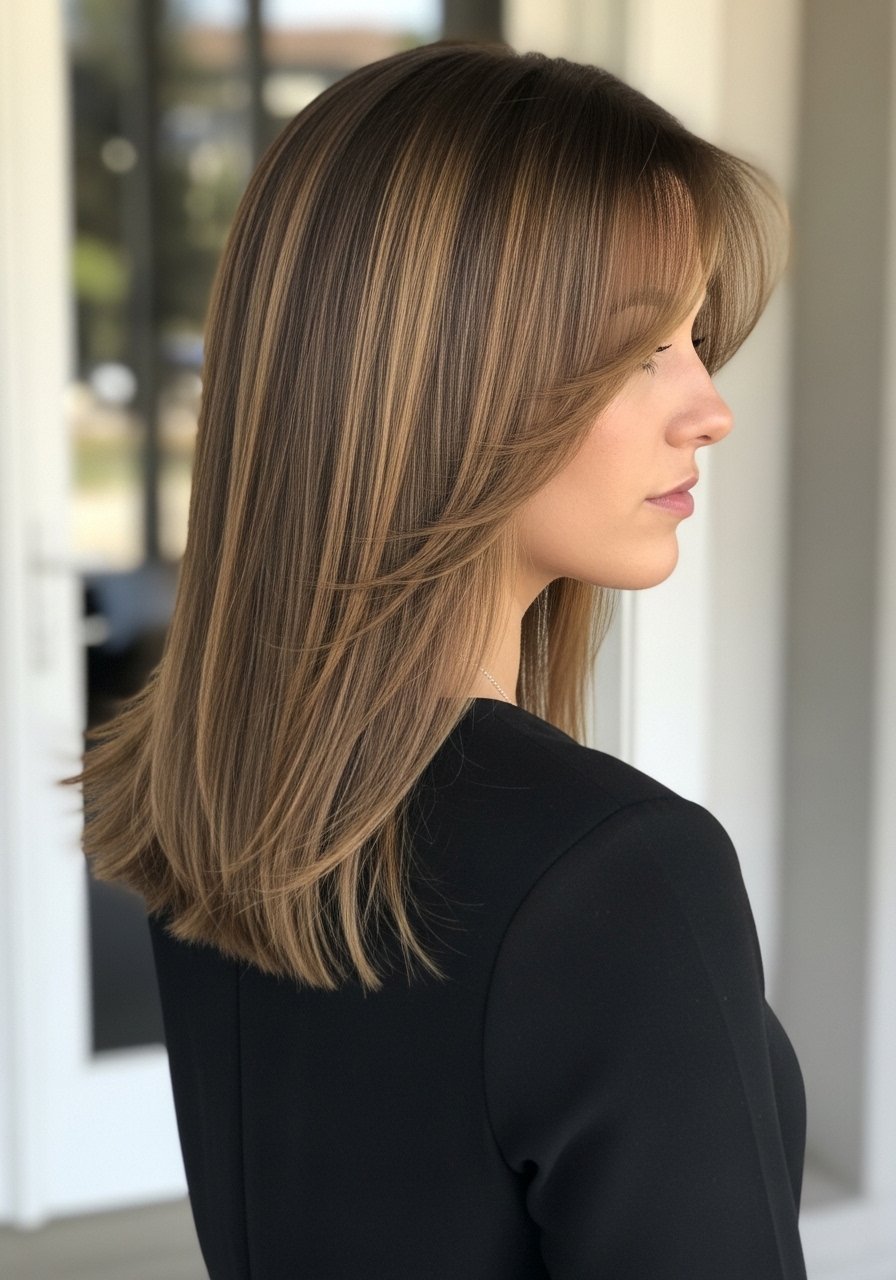
A lighter front slice lifts the whole face even when the rest of the hair stays natural. For straight hair that tends to look flat, two thin 1/2 inch panels on either side, foiled and left to process for 15 to 25 minutes depending on your starting color, usually brightens without a full-head commitment. If you DIY, use a lower volume developer and strand test first. Allergy patch and color history checks are important if you have recent dye. I bleached my own hair last winter trying to save $200. Three months later I paid $400 to fix it. Olaplex No. 3 saved what was left. For upkeep, a purple shampoo once every one to two weeks will stop brass without drying the mid lengths. A salon gloss every 8 to 12 weeks keeps the money piece from growing out harshly.
Blunt Lob With Soft Interior Layers for Mid-Thickness Hair

If your hair is medium density and tends to look heavy, a blunt outer line with soft slicing inside gives shape without losing the sleekness straight hair loves. Ask your stylist for the blunt perimeter and three to four soft interior slices that start around ear level. That detail prevents the blunt edge from looking boxy after two weeks. Maintenance is every eight to ten weeks for the line, and you can air dry this cut or run a quick 300 to 350 degree flat iron pass to polish the ends. A lightweight cream applied sparingly at the mid-lengths keeps the interior pieces from clumping. DIY razor attempts on this are risky, so book the cut unless you are confident with shears.
90s Middle Part Sleek Low Ponytail
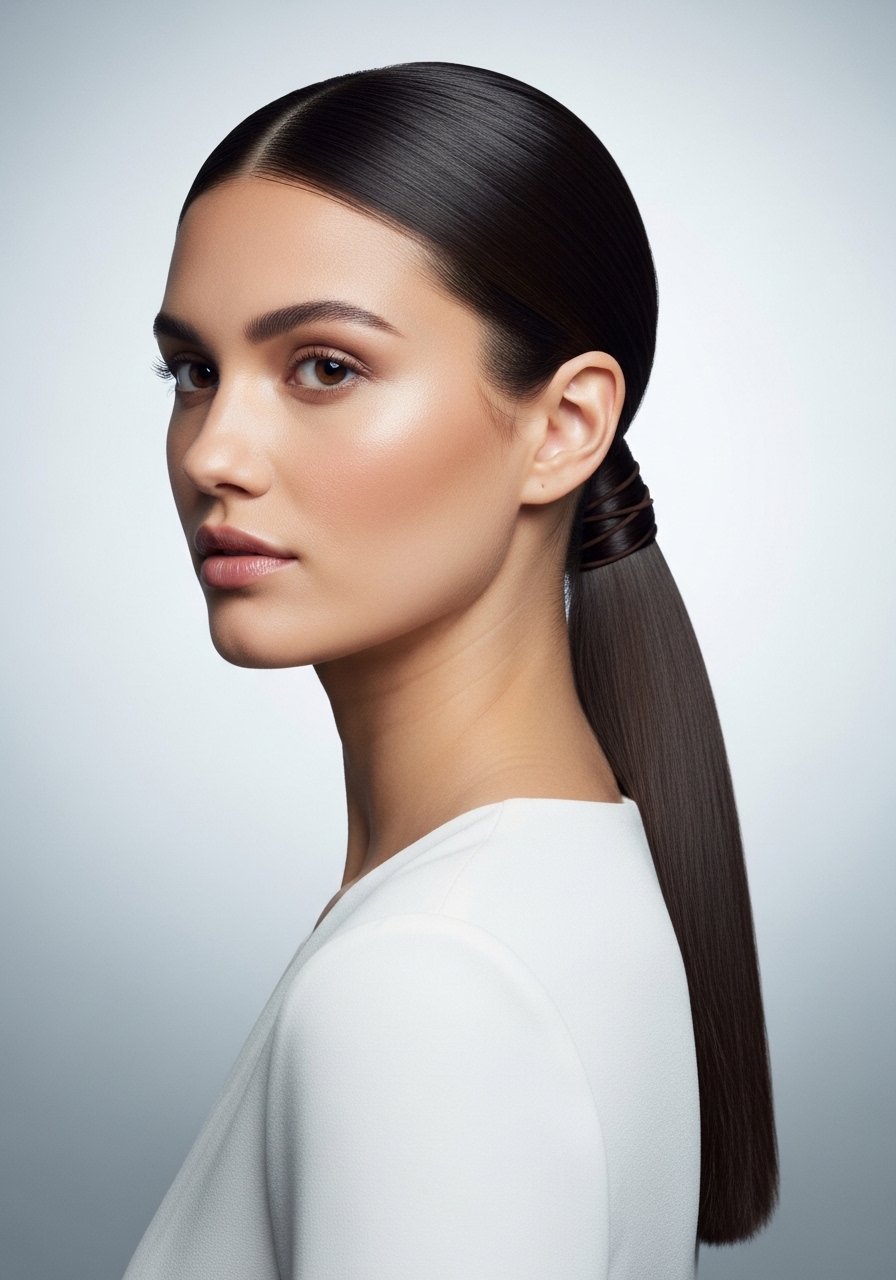
This is the fastest chic look that reads intentional and clean. Brush hair into a true center part, spray a fine mist of anti-frizz spray through the mid-lengths, then gather at the nape with low tension so the crown keeps a little natural lift. Wrap a small elastic and hide it by wrapping a one-inch slice of hair around the base. For shiny control, one drop of lightweight oil smoothed over the ends and hairline is enough. Common mistake, pulling too tight and creating a scalp ache or ponytail bumps. If your hair is fine, use a boar bristle brush to distribute natural oils first. This style takes under five minutes and costs nothing beyond a pack of elastics.
Heatless Rope Braid Waves With a Robe Tie
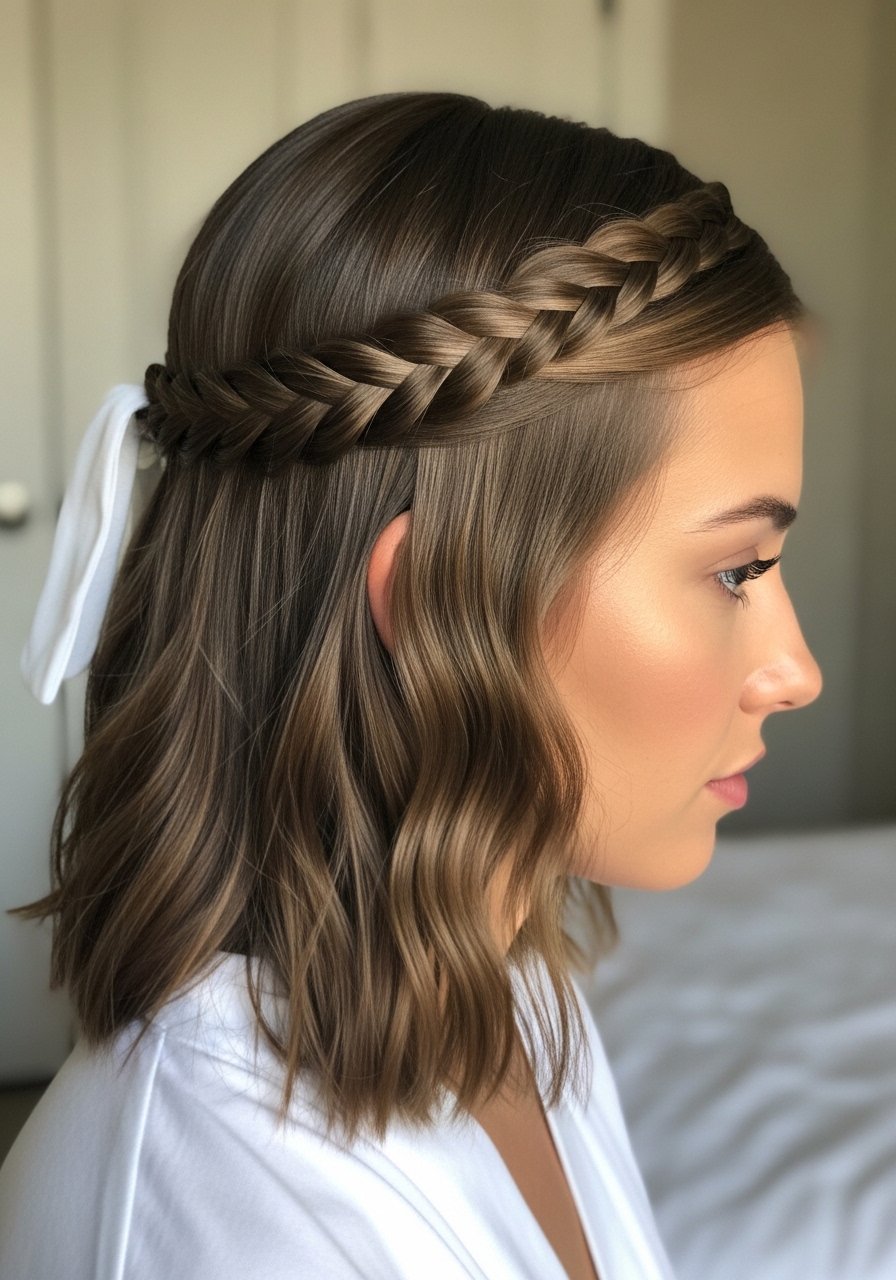
If you want beachy texture without heat, the robe tie method gives defined waves that stay through day two. Divide towel-dried hair into two vertical sections. Wrap each section around the robe tie three to six turns depending on how tight you want the wave, secure the ends, and sleep on it 7 to 9 hours. In the morning, unroll and finger-separate with a few drops of light oil on the tips. Mist sparingly with a sea salt spray only if you want extra grit. The mistake I see is leaving the hair completely wet when you sleep, which creates pressure frizz. Aim for slightly damp, not dripping, and tie the robe belt higher so the waves start from mid-length for more modern movement.
Curtain Bangs Styled Straight for Long Faces
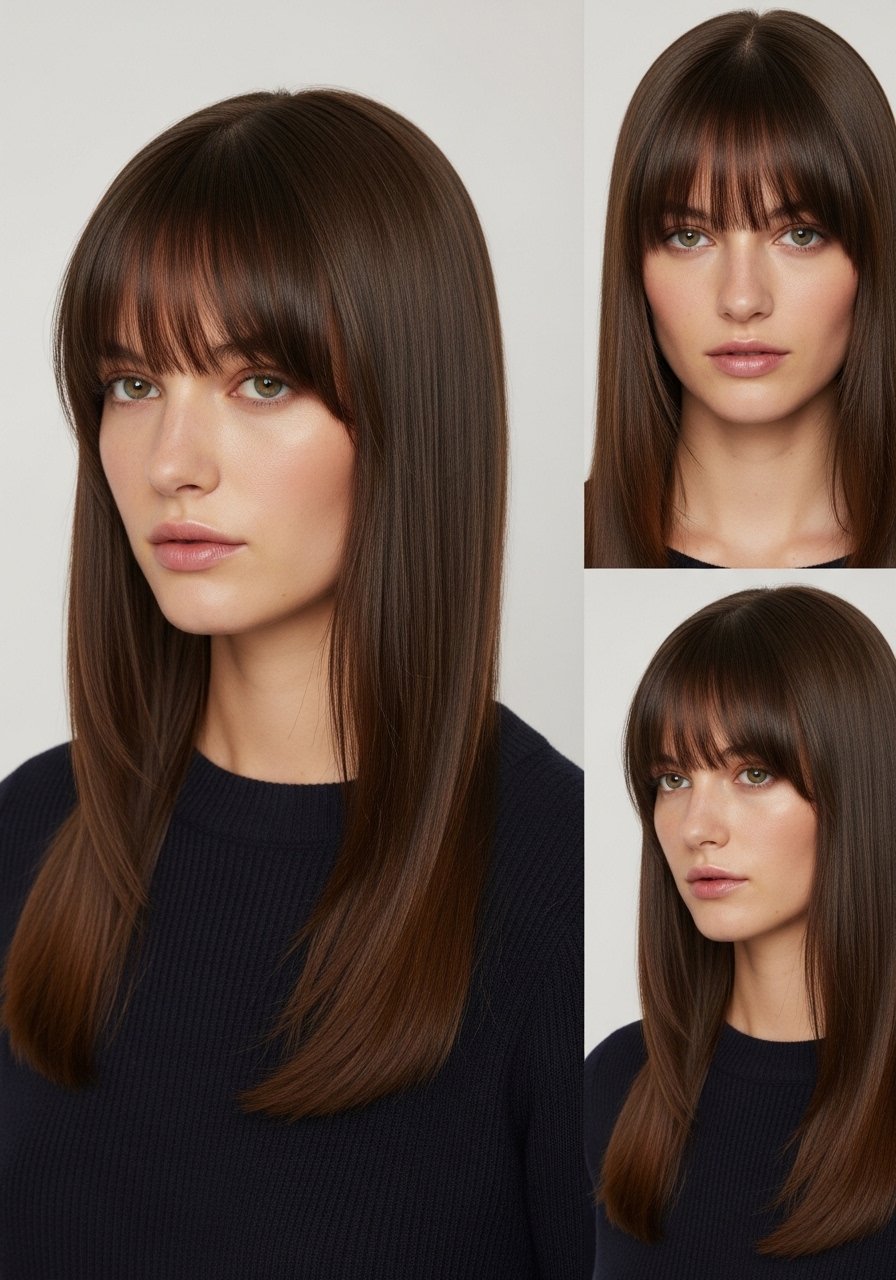
Curtain bangs open up the forehead without heavy weight. For long faces, a longer curtain that hits cheekbone or below balances proportions. When styling, blow dry bangs with a round brush away from the part at 300 to 350 degrees on the dryer, then set with a cool shot. Trim the first time with a pro unless you trim micro-adjustments; the common mistake is cutting them too short which makes them look harsh. Use a dime-sized smoothing cream before styling, and touchups every 6 to 10 weeks. If you have cowlicks, longer, softer bangs will behave better than a blunt fringe.
Glass Hair Finish Without a Salon Gloss
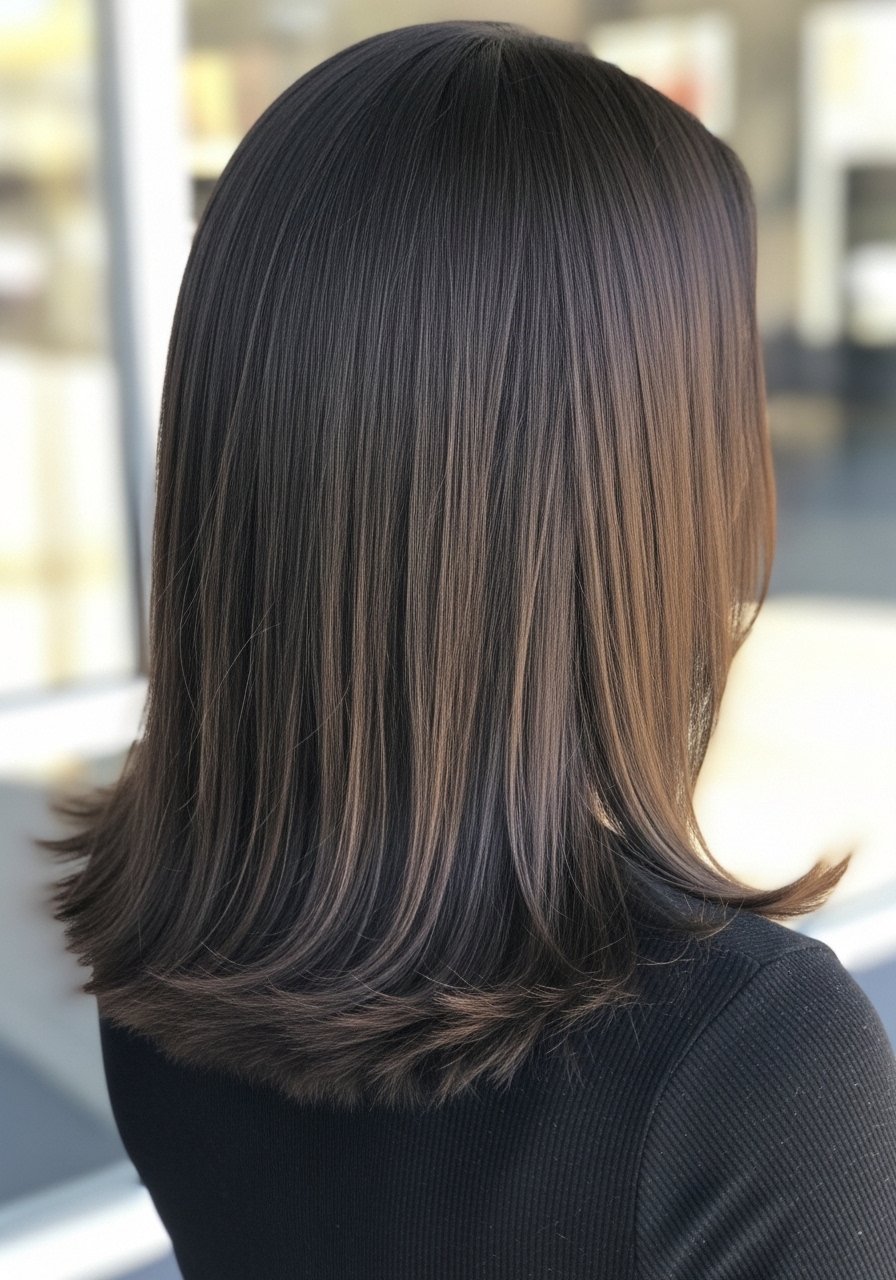
You can get the glass hair gloss effect at home with a strict sequence. Start with a clarifying wash once every two weeks to remove buildup. Add a weekly bond treatment on wet hair to strengthen strands. Blow dry on medium tension and finish with a flat iron set to 300 to 350 degrees for fine to medium hair, 375 degrees for thicker strands. Always apply a heat protectant before any iron over 300F. For anti-humidity and shine, a single light coat of a high-shine anti-humidity spray before the iron seals the look. Be careful with at-home gloss kits if your hair is heavily processed, a salon glaze will be safer. Also buy Olaplex and similar bond builders from the brand store on Amazon or Sephora to avoid counterfeits. Spend the extra $15 now, you will thank me later.
What I Keep in My Straight Hair Styling Kit
- Honestly, the one brush that does this every week. A 1.5 inch ceramic round brush for blowouts
- For smoothing and heat protection, a thermal protectant spray (~6 to 8oz)
- Bond builder for damaged ends, buy from authorized sellers. Olaplex No. 3 Hair Perfector 3.3oz, do a weekly 10 minute mask
- For shine and frizz control, a silicone serum (~1oz)
- A travel set of small elastics and a wrapped hair stick. No-metal hair elastics pack of 50
- For heatless styling, a robe tie belt or satin sash that is gentle on wet hair
- Anti-humidity shine spray, Color Wow Dream Coat (~3.4oz). One spray before iron stretches humidity resistance
- A small set of 1-inch and 1.25-inch flat irons, if you want both soft flicks and polished strands. A reliable 1-inch ceramic iron around $40
Textured Blade Cut for Slightly Wavy Straight Hair
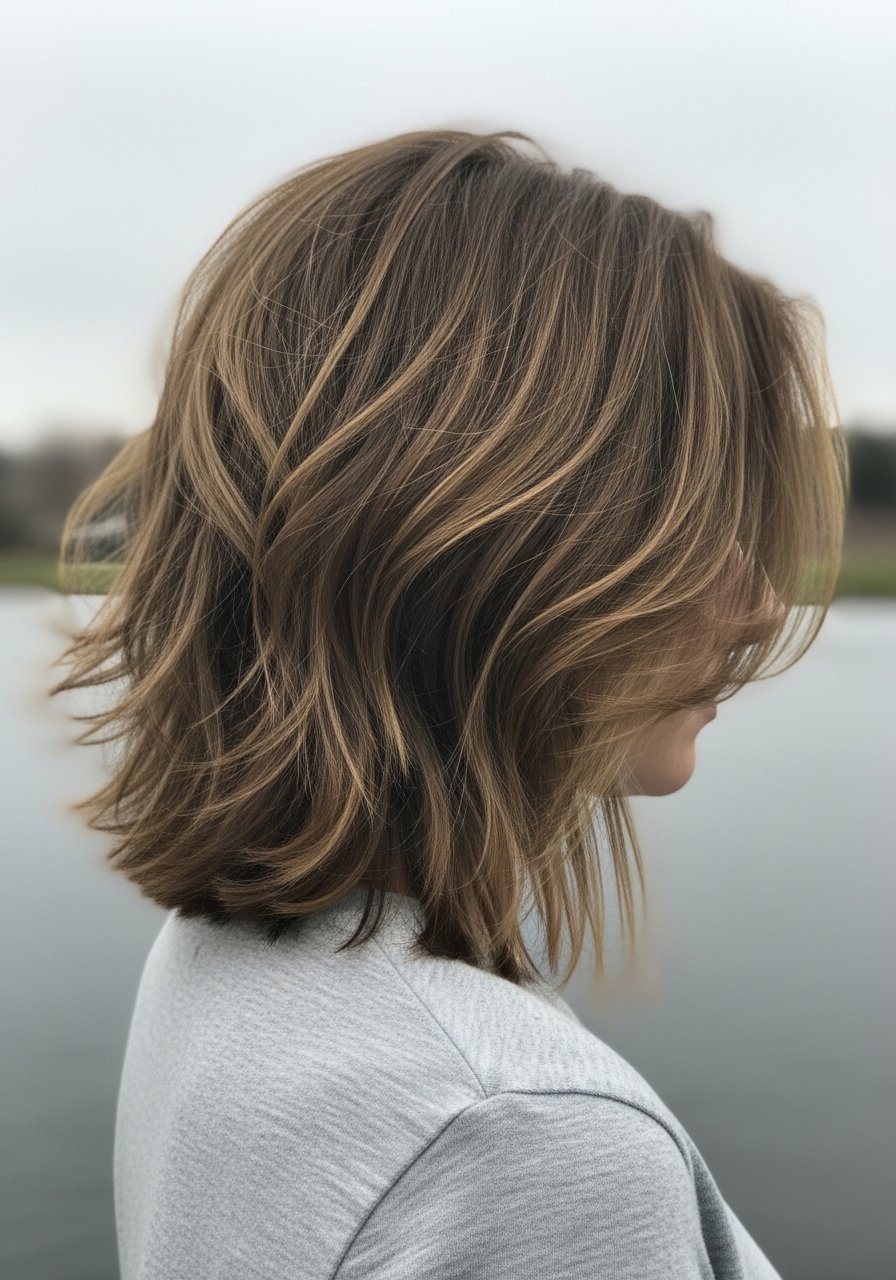
A textured blade or slide-cut adds small points of movement to otherwise straight hair. This suits slightly wavy or straight hair that needs more surface interest. The stylist will usually remove interior bulk by taking 1 to 2 inch slices at a 10 to 20 degree angle. DIY blade work can go sideways fast so book this one. For styling, apply a pea sized amount of texturizing cream to damp hair and scrunch with fingertips, or blow dry with a diffuser on low to encourage slight bend. Common mistake, using too much product which makes the texture look sticky. This cut ages well into three months between trims because the perimeter stays mostly blunt.
Claw Clip Half-Up for Fast Polish
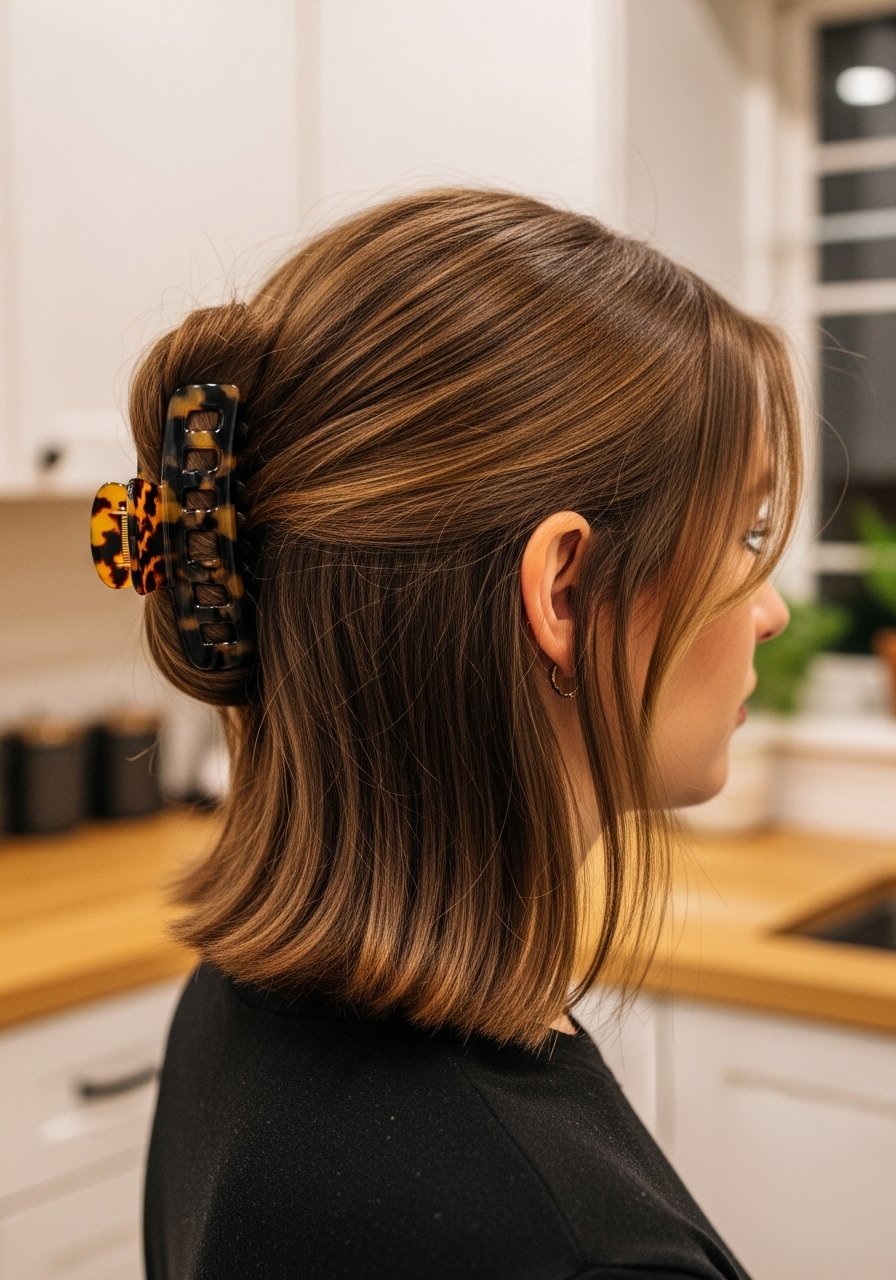
If you have five minutes and want something that looks put together, the claw clip half-up is lifesaving. Gather the top half of your hair, twist lightly, and secure the clip at the center back. For fine hair, tease the crown lightly with a boar bristle brush before clipping to add grip. A little dry shampoo at the roots before you style gives texture and helps the clip hold. Avoid over-clipping at the same spot daily to prevent creases. This is a great no-heat option for mornings when your hair is second day and you need a polished finish.
Soft Flicks With a One-Inch Iron for Short Straight Hair
Shorter straight styles read modern with a gentle outward flick at the ends. Use a one-inch iron, clamp the end of a one to two inch section, rotate the iron away from the face and hold for 2 to 3 seconds. For fine hair set the tool to 300 to 325 degrees. For thicker hair 350 to 375 degrees gives a cleaner bend. Always use a heat protectant before any iron over 300F. A common mistake is moving too slowly and burning the tip, which creates a kink instead of a soft flick. Finish with a light mist of anti-frizz spray and a comb through with fingers.
Low Tension Root Lift Without Backcombing

If flat roots are your main frustration, this technique adds volume without damaging the hair. Work with slightly damp hair. Apply a spray-in root lifter at the part and the crown, then flip your head over and blow dry with a diffuser on low while roughing the roots with fingertips for 30 to 45 seconds. Use a boar bristle brush to smooth the mid-lengths while keeping the crown airy. The 80/20 product placement rule helps here, put most product at roots and the smallest amount mid-lengths and ends. Two quick sprays of dry shampoo after your styling session will lock in lift for day two. This avoids the breakage that comes from repeated backcombing.
The Small Tricks That Make These Straight Looks Work
- Heat protectant goes on damp hair, not dry. The cuticle is more open and the product actually absorbs. A thermal protectant spray is worth the shelf space
- Grab a silk pillowcase under $20. It cut my morning frizz in half before I touched a single product
- Hair grows about half an inch a month at most, regardless of supplements. The thing that helps length retention is reducing breakage with a wide-tooth detangler brush and weekly bond treatments
- Drugstore shampoo is fine. Where you actually need to spend money is the conditioner and bond builder. Olaplex No. 5 Bond Maintenance Conditioner does more for damaged ends than a $40 shampoo ever will
- If you splurge on a tool, make it a good iron. I spent $300 on a Dyson Airwrap and used my $30 round brush more for the next year. Tools are wild that way
Frequently Asked Questions
Q: How often should I use Olaplex No. 3 on straight hair that is not visibly damaged?
A: Once a week is safe even for hair that is not visibly damaged. It acts as a pre-wash strengthening step. If your hair feels fine and you only style with heat occasionally, every other week is fine. Buy Olaplex from the brand store on Amazon or from Sephora to avoid counterfeits.
Q: Can I do a money piece at home without frying my hair?
A: You can, but only if you know your previous color history and do a strand test. Lifting over darker dye risks breakage. Use lower developer volume and process time conservatively, and plan a salon gloss afterward if anything looks uneven. If you have doubts, book a color consult.
Q: How often should I use purple shampoo on lightened straight hair?
A: Once every one to two weeks is usually enough to curb brass without drying the hair. If your hair starts to feel straw like, back off. A conditioning mask the following wash usually balances it out.
Q: Is backcombing the only way to add root volume for fine straight hair?
A: No. Backcombing causes wear at the cuticle and breakage over time. Use low tension root lift sprays, rough-dry with fingers, and lightweight powders or dry shampoos to create lift without the damage. The backcombing-free technique in this article gives comparable height without the wear.
Q: My blunt lob feels boxy after a few weeks. What am I doing wrong?
A: The most common cause is too much product at the roots or using heavy conditioners that weigh the line down. Try applying product with the 80/20 rule, most at the mid-lengths and ends and almost none at the roots. A quick light round-brush blow and a pea size of smoothing cream on the ends usually refreshes the shape until your next trim.

