
I wanted face-framing brown highlights on my natural black hair for months, then I sat in the stylist chair and watched them sketch five thin stripes that looked like banded tape. After a couple of fixes and a kitchen-bleach near-miss, I learned which placements actually brighten the face without constant touch-ups. Below are the looks and real-life routines that worked on my hair and the friends I helped rescue.
These ideas mostly serve straight 1B to curly 3A textures, fine to medium density, shoulder length to mid-back. A few notes for thicker 3B to 4A hair are called out where they need different product amounts. Most looks can be started at home if you are careful, but anything with heavy lift or bleach over previous color is a salon job. Budget ranges from under $20 for one kit to about $150 for a salon gloss and professional toner.
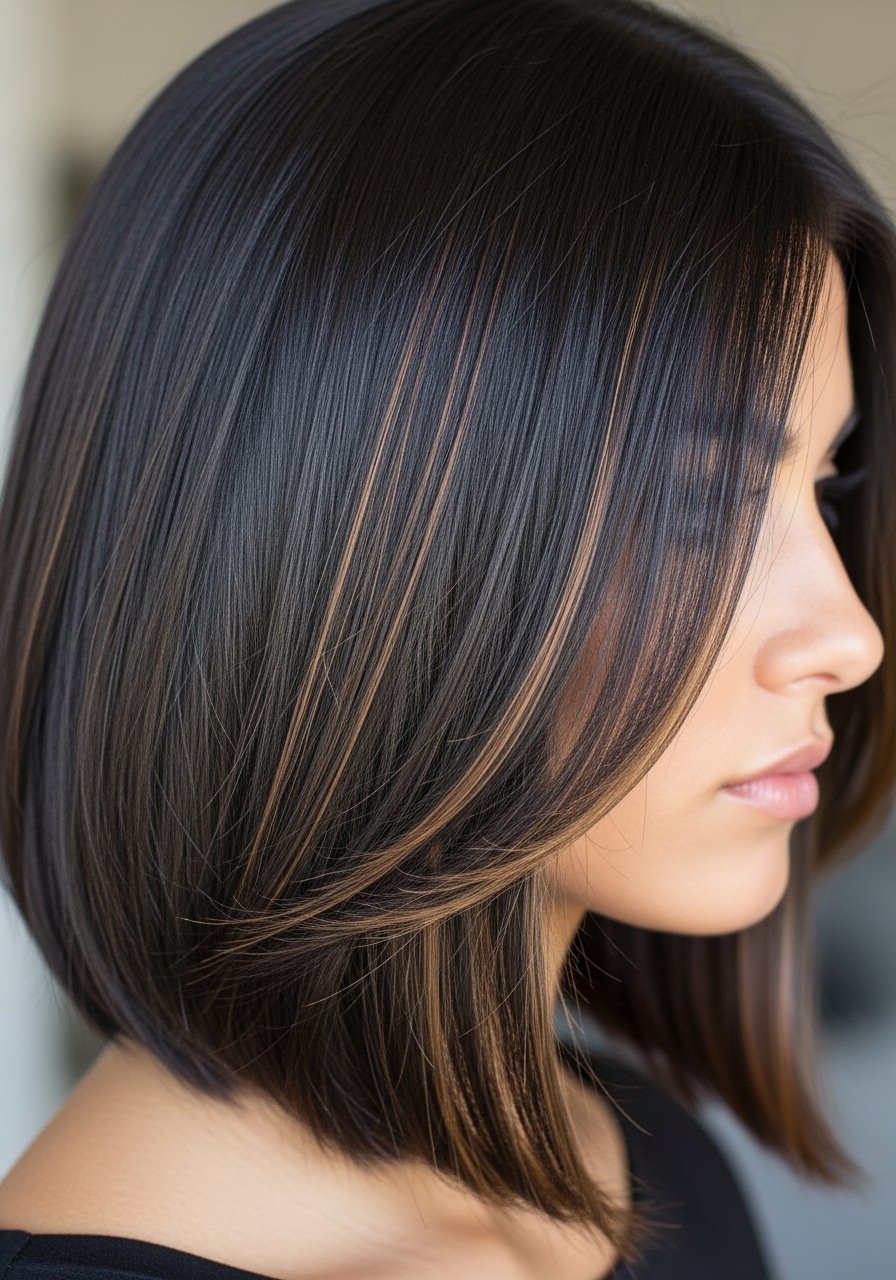
Money Piece Face-Framing For Round Faces

This is the most immediate way to make brown highlights on black hair face framing actually look intentional. Ask for two to four 1/4-inch sections at the temples, painted with a 10 to 20 volume developer depending on how much lift you need. Expect a one-hour salon slot for a single session, or try a trained friend with a cap for a softer DIY. A common mistake is asking for thick chunky slices, which read harsh on round faces. If you go DIY, use a lower developer and do a strand test. Heat protectant goes on damp hair, not dry. Most heat protectants you spray on dry hair before flat ironing barely work. They need to absorb into damp or just-dried hair to actually shield the cuticle.
Balayage That Grows Out Without Weird Lines

Balayage is the friendliest option if you hate the salon obligation. Have your stylist paint slightly thinner slices around the face and feather with a 40/60 ratio of lighter to darker tones for face-framing warmth. The real trick is painting a faint halo line about an inch behind the hairline so regrowth looks like a soft shadow instead of a stripe. For fine hair, keep the sections at 1/8 inch so the highlights read blended. Timewise this is a 90-minute salon service. Avoid overlapping bleach on previously lightened hair. If your hair has been colored before, book a consult first.
Babylight Caramel Threads For Fine Straight Hair
Babylights are basically tiny slices painted thinly, perfect for fine straight hair that needs brightness without losing density. I tell my stylist to do eight to twelve ultra-thin face-framing threads, placed asymmetrically so they catch daylight naturally. Expect 60 to 90 minutes and a higher cost per ounce of product because this is meticulous work. A frequent mistake is using heavy toner that kills the warm caramel. Ask for a low-ash, warm neutral toner and book a gloss three to four weeks after to settle the tone.
Chestnut Pieces To Warm Up Cool Skin Tones

Chestnut highlights add warmth without going orange, which is great if your skin has cool undertones. For curly hair I recommend placing pieces around the face and at the crown only. Curly strands show highlights more intensely so fewer pieces are better. Use a gentle bond builder during processing, and leave-on a product like Olaplex No. 3 hair perfector for three to five minutes before rinsing to reduce breakage. Heatless drying after color keeps cuticles calmer. Bleach over bleach is a high-risk move. If your hair has been lightened before, see a salon.
Underlit Brown Strips For a Peekaboo Effect
Underlights are one of my favorite low-commitment options. The top hair hides the color until you move or put your hair up. It is quick at the salon and cheaper to maintain because the regrowth is invisible. Use two or three 1-inch sections under each side, lifted to a caramel brown with a gloss to avoid brass. A common mistake is lifting the underside too light and creating a band when hair is pulled up. If DIY, use foils and small sections, and never lift darker than you can comfortably tone back in one session.
Micro Face-Framing For Short Bobs

Short bobs can look harsh if the highlights are too wide. Micro face-framing uses slivers, usually five to eight tiny pieces, to add dimension without changing the silhouette. For short hair you want a cooler brown on the ends and a touch warmer at the root to mimic natural sun fade. This is a 45-minute add-on at the salon and very doable at home with a highlighting cap if you are patient. Watch for scalp sensitivity when working close to the hairline. Always perform an allergy patch test with any salon product.
Salon Gloss For Shine And Slight Tone Shifts

If you want brown highlights on black hair face framing without lifting again, the salon gloss is your secret weapon. A demi-permanent glaze can warm or tone down highlights and refresh face-framing pieces in 30 minutes. It costs less than a full color correction and the result often lasts four to six weeks on the face-framing strands. Note that glosses are temporary and will wash out gradually. For darker brown tones a gloss avoids extra bleach. Also, buy from the official store on Amazon or grab it from Ulta to avoid counterfeits.
What I Actually Keep On The Shelf For Brown Face Frames
- Olaplex No. 3 hair perfector. Use once a week after color. Buy from the official seller on Amazon or Sephora to avoid counterfeits
- Color Wow Dream Coat anti-humidity spray (~$28). One spritz before blow dry for frizz control
- 8oz sulfate-free clarifying shampoo for one-off color resets
- A silicone tint brush and bowl set for neat DIY face pieces (~$12)
- A silk pillowcase queen size. Hair grows about half an inch a month at most, regardless of what biotin gummies promise you
- A lightweight heat protectant spray formulated to be applied on damp hair
- A set of 12 clip-in highlight foils for small DIY face-framing work (~$15)
- A bond builder at-home kit for color sessions when you cannot get to the salon
Low-Maintenance Peek Highlights For Busy Schedules

If you are chronically short on time, ask for highlights placed in zones that move instead of the hairline. Think temple, cheekbone, and underneath the crown. That placement makes them visible when you style but invisible on a wash day, so you only need color refreshes every 12 to 16 weeks. A mistake people make is expecting the same brightness as salon photos. Brown highlights on black hair face framing will read softer in daylight than under salon lights. Use a leave-on gloss every four weeks if you want to refresh the tone.
Heatless Color-Enhancing Brown With No Iron

Heatless does not mean zero upkeep. Color-depositing conditioners are great for maintaining face-framing brown tones without daily heat. Apply a quarter-sized amount to the highlighted pieces once every two to three washes and sit with a warm towel for 10 minutes. This is perfectly fine for Type 3A curls and 2C waves. The common mistake is leaving it on too long and over-depositing. Patch test first. If you want a specific product, try a shade-matched pigment-based conditioner applied to damp hair for 10 minutes.
Face-Framing For Curly 3A-4A Textures

Curly and coily textures show color banding differently. I have seen face-framing highlights look streaky on 4A hair when they are placed in long vertical slices. Instead, ask for shorter, staggered sections that follow the curl spring, roughly 1.5 to 2-inch pieces spaced naturally across the front. Use a bond builder in the lightening mix and rinse with cool water. The LOC method is useful after coloring. Apply leave-in, then oil, then cream to protect and seal the colored curls. Avoid heavy heat the first two weeks after processing.
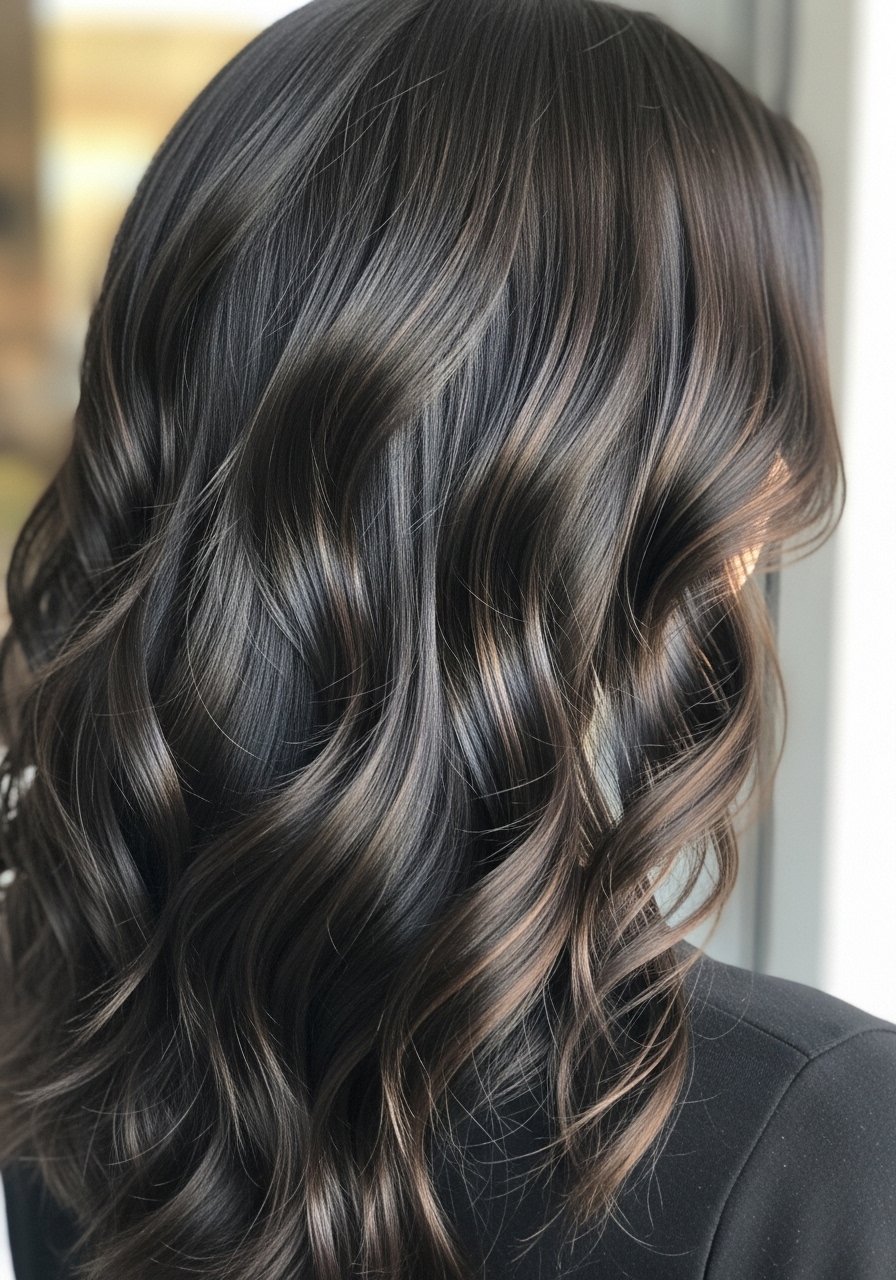
Deep Chocolate Melt For Cool Black Bases

A chocolate melt is essentially a low-contrast blend that reads very natural on cool black bases. Technically, it is a root-smudge combined with painted mid-lengths. Ask for a 70/30 blend of root darkness to highlight brightness so the face frame reads color-warmed without obvious lines. This usually takes 75 to 90 minutes at the salon. The trick most stylists miss is leaving a tiny bit more warmth around the face to avoid looking washed out in indoor light.
Piecey Highlights Around Bangs For Softness

Bangs change everything. Painting small face-framing pieces directly into bangs makes the haircut look softer and more intentional. For curtain bangs leave the highlights slightly warmer than the rest so they catch light near the cheekbones. The risk is over-processing at the fringe, which can dry out fine hair. Use a conditioning gloss three weeks after and rinse with cool water to lock the tone. If your bangs are short, do a strand test to confirm the lift will be even.
DIY Baby Lights With A Cap And Patience

Yes, you can do baby lights at home, but be honest about the limitations. The cap method is precise for very thin pieces, but it pulls the hair straight and can over-light curl patterns. Use a 10 to 20 volume developer and keep each pulled strand under foil for no more than 20 minutes for a caramel tone on black hair. A common DIY mistake is leaving sections too thick. If you are trying this for the first time, practice on a hidden section and plan to book a salon gloss afterward if the tone needs blending.
Root-Smudge Touch Up To Extend Salon Time

Root smudging is the lazy person's miracle for face-framing highlights. It blends the root back into the highlight so the regrowth line softens. Most stylists do this with a 5-minute smudge using a demi-gloss. You can buy a small smudge kit for around $15 and do it at home in 10 minutes if you are careful. The safety catch is avoiding overlap on previously lightened pieces. If you have had trouble with breakage, use a bond-building rinse after the smudge.
Lived-In Face Frame For Shoulder-Length Hair

This is the “I had highlights three months ago and they still look deliberate” approach. Stylists create it by painting low-contrast pieces and smudging the root, then finishing with a demi-gloss. For shoulder-length hair, three to five 1/2-inch face-framing pieces usually read balanced. Maintenance is low. A common trap is adding too many highlights which increases salon visits and expense. Remember, hair grows about half an inch a month at most, regardless of what biotin gummies promise you, so plan touch-ups around realistic timelines.
How I Stopped Overdoing It Before A Color Appointment
- Heat protectant goes on damp hair, not dry. The cuticle is more open and the product actually absorbs. A lightweight heat protectant spray is worth applying before any iron over 300F
- Friends kept recommending the cheapest toner. Spend a little more and get a salon gloss. A demi-permanent gloss refreshes face-framing pieces for weeks
- Most heat protectants you spray on dry hair before flat ironing barely work. They need to absorb into damp or just-dried hair to actually shield the cuticle
- Use the 80/20 product placement rule. Put 80 percent of product on mid-lengths and ends, 20 percent near the roots. A leave-in cream that you apply sparingly at the crown makes styling easier
- If you must DIY face frames, section into smaller slices, roughly 10 to 14 sections across the front, and lift in short timed bursts. Buy a highlighting cap and hook for neatness
Frequently Asked Questions
Q: Can I get brown highlights on black hair face framing without bleach?
A: If you want any visible lift from black hair, some lightening is necessary. Glosses and color-depositing products can warm and tone existing highlights, but they will not create a caramel lift on a very dark base. For subtle warmth try a demi-gloss first.
Q: How often will I need touch-ups for face-framing pieces?
A: For most placements you can stretch to 10 to 16 weeks, depending on how high the lift is. Micro babylights fade faster. If you want less upkeep, ask for softer placement and a root-smudge at the appointment.
Q: Will highlights make my hair feel damaged?
A: Lightening does stress the hair. Using a bond builder during the service and doing weekly at-home treatments like Olaplex No. 3 hair perfector reduces breakage risk but will not erase past damage. If your hair has had multiple lifts, book a consult.
Q: Can I DIY a money piece at home?
A: You can, but be cautious. Money pieces are front and center. Use thin 1/4-inch sections, a lower-volume developer, and do a strand test in an inconspicuous spot first. If you have previously colored hair, skip DIY and see a pro.
Q: How do I keep face-framing highlights from turning brassy?
A: Use a purple or blue shampoo only once every seven to ten washes if you notice brass. Overuse dries hair. A gloss every three to four weeks also keeps tone refreshed. If you need a quick fix, a color-depositing conditioner in the right shade for 10 minutes usually helps.
Q: Is there a way to hide highlights when I want to go darker again?
A: Yes. A demi-permanent all-over color that is one to two shades darker than your highlights can blend them without heavy lifting. Ask for a color that is slightly warmer so the face frame still looks natural. If you have any scalp sensitivity, do an allergy test first.

